The Power of Portability: Creating a Bootable Windows 10 USB Drive
Related Articles: The Power of Portability: Creating a Bootable Windows 10 USB Drive
Introduction
In this auspicious occasion, we are delighted to delve into the intriguing topic related to The Power of Portability: Creating a Bootable Windows 10 USB Drive. Let’s weave interesting information and offer fresh perspectives to the readers.
Table of Content
The Power of Portability: Creating a Bootable Windows 10 USB Drive

In the realm of computer technology, versatility and convenience are paramount. The ability to install or repair operating systems without relying on physical media like DVDs has become increasingly sought after. This is where the concept of a bootable USB drive for Windows 10 comes into play, offering a streamlined and efficient solution for various scenarios.
Understanding the Concept: What is a Bootable USB Drive for Windows 10?
A bootable USB drive for Windows 10 essentially transforms a standard USB flash drive into a portable operating system installer. This means the drive contains all the necessary files and programs to initiate the installation or repair of Windows 10 on a computer. When the computer boots from this USB drive, it accesses the installation files stored on it, allowing the user to perform various tasks, such as:
- Clean Installation: Installing a fresh copy of Windows 10, erasing all previous data and settings.
- Upgrade: Upgrading an existing Windows version to Windows 10.
- Repair: Troubleshooting and fixing issues with an existing Windows 10 installation.
- System Recovery: Restoring a computer to a previous working state.
Benefits of Using a Bootable USB Drive:
-
Enhanced Portability: The primary advantage lies in its portability. Instead of carrying bulky DVDs or relying on internet connections for downloads, a bootable USB drive allows for easy transport and immediate access to the Windows 10 installation process.
-
Flexibility and Convenience: This method offers flexibility in various scenarios. It can be used to install Windows 10 on multiple computers, repair existing installations, or even create a backup of the operating system.
-
Faster Installation: Compared to traditional DVD-based installations, a bootable USB drive can significantly reduce the time required to install or repair Windows 10.
-
Troubleshooting and Repair: When encountering system errors or malfunctions, a bootable USB drive provides a reliable means to access troubleshooting tools and repair functionalities, potentially saving valuable data and time.
Creating a Bootable USB Drive: A Step-by-Step Guide
Creating a bootable USB drive for Windows 10 is a straightforward process that can be accomplished with the following steps:
-
Download the Windows 10 Installation Media: Visit the official Microsoft website and download the Windows 10 ISO file corresponding to your preferred edition and language.
-
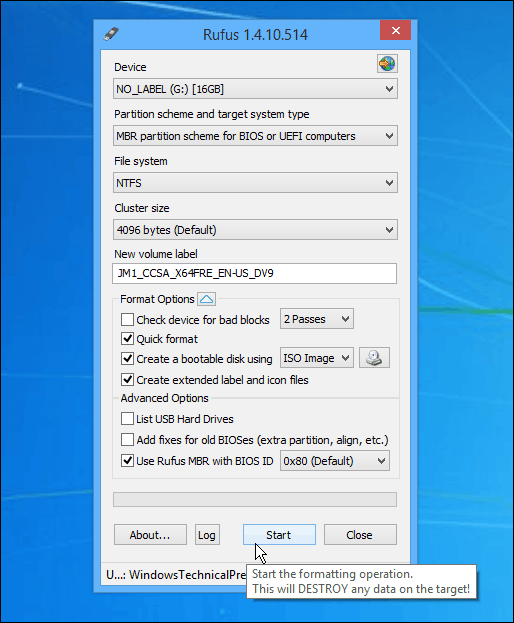
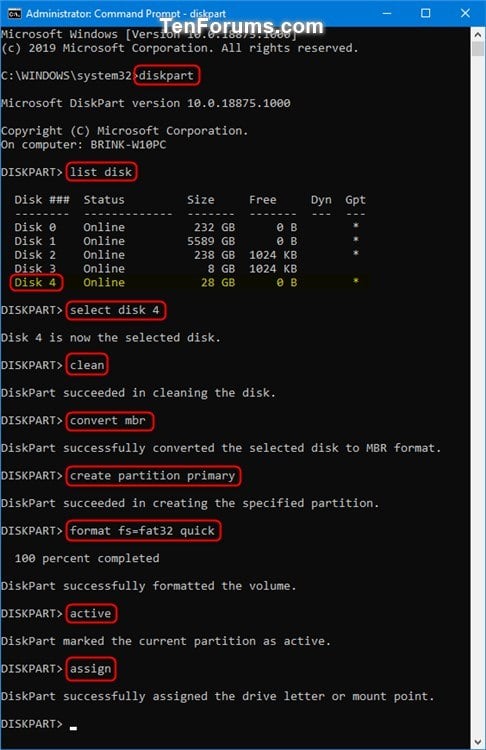
Prepare the USB Drive: Ensure the USB drive has sufficient storage capacity (at least 8 GB) and is formatted as FAT32. Back up any essential data from the USB drive as the formatting process will erase all existing content.
-
Use the Media Creation Tool: Microsoft provides a dedicated Media Creation Tool that simplifies the process of creating a bootable USB drive. Download and run the tool, select "Create installation media for another PC," and follow the on-screen instructions.
-
Select the USB Drive: During the process, choose the USB drive as the destination for the installation files.
-
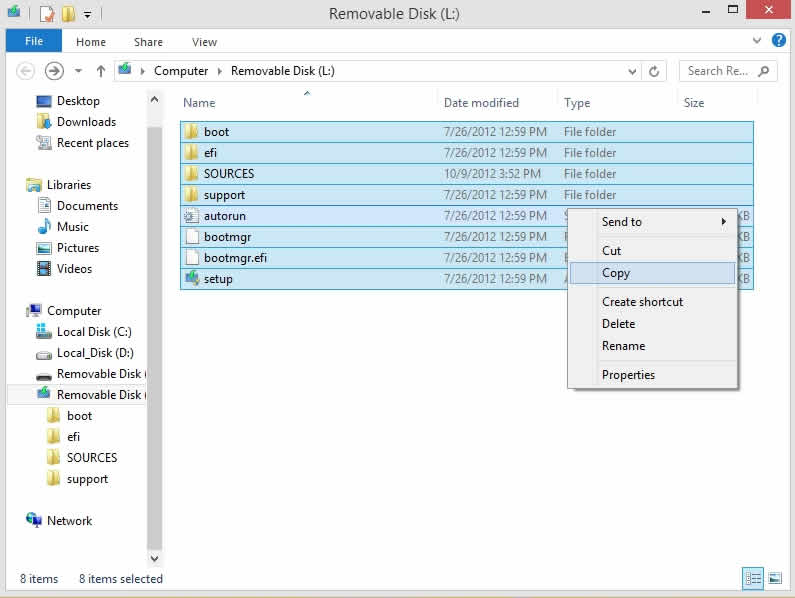
Wait for the Process to Complete: The Media Creation Tool will copy the necessary files to the USB drive, creating a bootable installer.
-
Verify the Bootable Drive: After the process is complete, eject the USB drive safely and test its functionality by booting your computer from it.
Booting from the USB Drive:
To boot your computer from the USB drive, you need to access the BIOS (Basic Input/Output System) settings. This process varies depending on the computer manufacturer, but typically involves pressing a specific key (such as F2, F10, or Del) during the startup sequence.
Once in the BIOS, navigate to the "Boot" or "Boot Order" settings and prioritize the USB drive as the first boot device. Save the changes and exit the BIOS. The computer will then boot from the USB drive, initiating the Windows 10 installation process.
Frequently Asked Questions (FAQs):
-
What if my computer doesn’t have a USB port? If your computer lacks a USB port, you can use an external USB adapter or consider alternative installation methods, such as using a DVD or network installation.
-
Can I use a bootable USB drive to install Windows 10 on a virtual machine? Yes, you can use a bootable USB drive to install Windows 10 within a virtual machine environment. However, you might need to adjust the settings within the virtual machine software to recognize the USB drive as a bootable device.
-
Can I create a bootable USB drive for a different version of Windows? Yes, the process of creating a bootable USB drive can be applied to other versions of Windows, such as Windows 7 or Windows 8.1. However, ensure you download the correct ISO file for the desired version.
-
What happens to my existing data during a clean installation? A clean installation of Windows 10 will erase all data and settings from the hard drive. It’s crucial to back up any essential data before proceeding with a clean installation.
-
Can I use a bootable USB drive to recover my Windows 10 installation? Yes, a bootable USB drive can be used to access recovery tools and perform system repairs, potentially restoring your Windows 10 installation to a previous working state.
Tips for Using a Bootable USB Drive:
-
Check for Compatibility: Ensure the USB drive is compatible with your computer and meets the minimum system requirements for Windows 10.
-
Use a Reliable USB Drive: Choose a high-quality USB drive from a reputable brand to ensure stability and data integrity.
-
Back Up Your Data: Always back up your important data before performing any major system changes, including clean installations or repairs.
-
Keep the USB Drive Secure: Store the USB drive in a safe place to prevent accidental damage or loss of the installation files.
-
Update the USB Drive: If you plan to use the USB drive for multiple installations or repairs, ensure it’s updated with the latest Windows 10 installation files to avoid compatibility issues.
Conclusion:
Creating a bootable USB drive for Windows 10 empowers users with a portable, flexible, and efficient tool for various scenarios. Whether installing a fresh copy of Windows 10, upgrading an existing version, or troubleshooting system issues, this method provides a streamlined and convenient solution. By understanding the process, benefits, and FAQs associated with this approach, individuals can confidently leverage the power of a bootable USB drive to manage their Windows 10 installations with ease.

Closure
Thus, we hope this article has provided valuable insights into The Power of Portability: Creating a Bootable Windows 10 USB Drive. We appreciate your attention to our article. See you in our next article!