A Comprehensive Guide to Installing Windows 10 or Windows 11: A Step-by-Step Walkthrough
Related Articles: A Comprehensive Guide to Installing Windows 10 or Windows 11: A Step-by-Step Walkthrough
Introduction
With enthusiasm, let’s navigate through the intriguing topic related to A Comprehensive Guide to Installing Windows 10 or Windows 11: A Step-by-Step Walkthrough. Let’s weave interesting information and offer fresh perspectives to the readers.
Table of Content
A Comprehensive Guide to Installing Windows 10 or Windows 11: A Step-by-Step Walkthrough
The process of installing a new operating system, like Windows 10 or Windows 11, can seem daunting, but it’s a crucial step in maximizing the performance and security of your computer. This comprehensive guide will walk you through the process, providing clarity and confidence in navigating each stage.
Understanding the Fundamentals: Windows 10 and Windows 11
Before delving into the installation process, it’s essential to grasp the fundamental differences between Windows 10 and Windows 11, enabling you to make an informed decision for your specific needs.
Windows 10:
- Release Date: July 29, 2015
- Key Features:
- User-friendly interface with a Start menu and taskbar.
- Enhanced security features, including Windows Defender.
- Compatibility with a wide range of hardware and software.
- Regular updates to improve stability and security.
- Advantages:
- Well-established and mature operating system with extensive support.
- Wide availability of software and drivers.
- Lower hardware requirements compared to Windows 11.
- Disadvantages:
- Older version with potential security vulnerabilities.
- May lack some of the latest features found in Windows 11.
Windows 11:
- Release Date: October 5, 2021
- Key Features:
- Modernized design with rounded corners and a centered taskbar.
- Improved performance and efficiency.
- Enhanced security features, including Windows Hello for biometric authentication.
- Integration with Microsoft Teams for seamless communication.
- Advantages:
- Latest operating system with cutting-edge features.
- Enhanced security and performance.
- Improved user experience with a refined design.
- Disadvantages:
- Higher hardware requirements.
- Limited software compatibility in early stages.
- May require more resources for optimal performance.
Choosing the Right Operating System:
The decision between Windows 10 and Windows 11 hinges on several factors:
- Hardware Compatibility: Windows 11 has stricter system requirements, including a compatible processor, sufficient RAM, and secure boot enabled.
- Software Compatibility: Windows 10 boasts greater software compatibility, particularly with older applications.
- User Preferences: Consider your comfort level with the interface and features of each operating system.
- Budget: Windows 11 might require upgrading your hardware to meet its requirements.
Preparing for Installation: Essential Steps
Prior to embarking on the installation process, ensure you have completed these essential steps:
- Back Up Your Data: Safeguard your valuable data by creating a backup. This could involve using an external hard drive, cloud storage, or a backup software solution.
- Gather Installation Media: Obtain a bootable USB drive or DVD containing the Windows installation files. You can create a bootable USB drive using the Microsoft Media Creation Tool, available on the official Microsoft website.
- Check System Requirements: Ensure your hardware meets the minimum requirements for the chosen operating system. Refer to the official Microsoft website for detailed specifications.
- Disable Antivirus Software: Temporarily disable your antivirus software to prevent conflicts during installation. Remember to re-enable it after the installation is complete.
- Disconnect External Devices: Disconnect any unnecessary external devices, such as printers or external hard drives, to avoid potential conflicts.
Installing Windows 10 or Windows 11: A Step-by-Step Guide
The installation process is relatively straightforward, but it’s crucial to follow these steps meticulously:
- Boot from Installation Media: Restart your computer and press the appropriate key (usually F12 or F10) to access the boot menu. Select the bootable USB drive or DVD containing the installation files.
- Choose Installation Language and Options: Select your preferred language, time and currency format, and keyboard layout.
- Start Installation: Click "Install Now" to begin the installation process.
- Enter Product Key (Optional): If you have a product key for a retail version of Windows, enter it now. However, if you’re using a digital license or a pre-installed version, you can skip this step.
- Accept License Terms: Carefully read and accept the license terms before proceeding.
- Choose Installation Type: You can choose to either upgrade your existing operating system or perform a clean installation. A clean installation will wipe your hard drive and install Windows from scratch.
- Select Partition: Choose the partition where you want to install Windows. If you are performing a clean installation, you will need to format the partition.
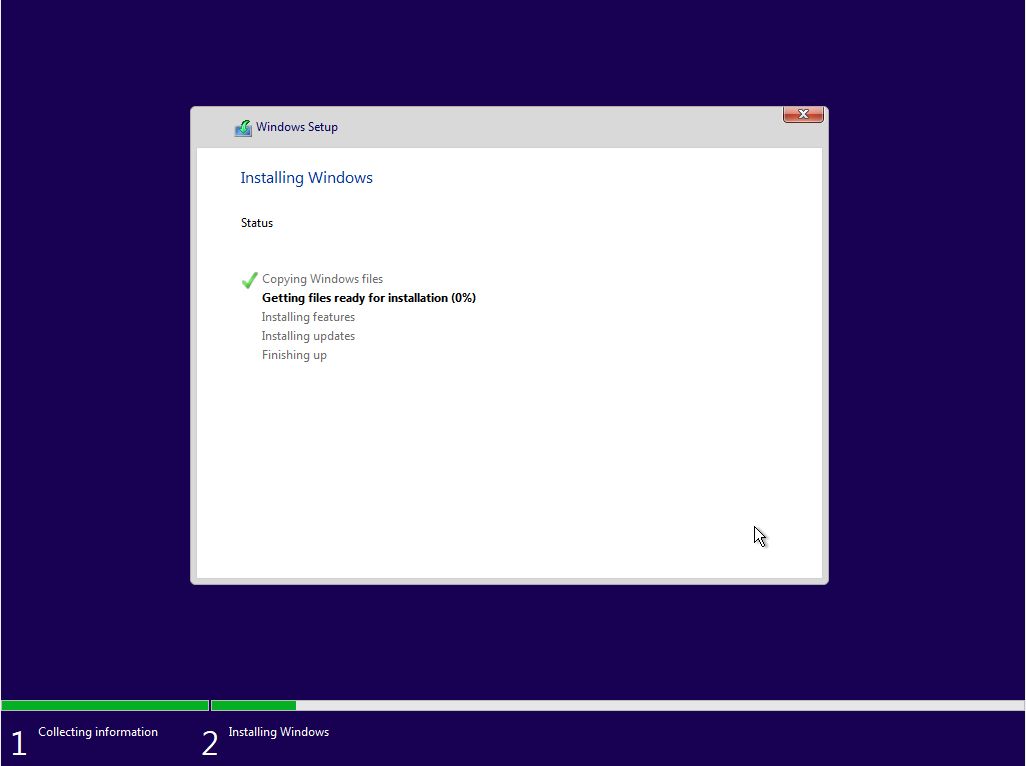
- Installation Process: The installation process will begin, which may take some time depending on your hardware and the chosen installation type.
- Configure Windows: Once the installation is complete, you will be prompted to configure your Windows settings, such as creating a user account, setting up your network, and personalizing your preferences.
Post-Installation Steps:
- Install Drivers: Ensure your computer has the necessary drivers for all hardware components. You can download these drivers from the manufacturer’s website or use Windows Update.
- Install Essential Software: Install your preferred applications, such as web browsers, office suites, and antivirus software.
- Run Windows Updates: Regularly check for and install Windows updates to enhance security, performance, and stability.
- Activate Windows: If you haven’t already activated Windows during installation, you can do so by entering your product key or using a digital license.
Troubleshooting Common Installation Issues:
While the installation process is generally straightforward, you may encounter some common issues:
- Boot Issues: If you encounter boot issues, try changing the boot order in your BIOS settings to prioritize the bootable USB drive or DVD.
- Error Messages: If you receive error messages during installation, carefully read the message and try to identify the cause. You may need to check your hardware, drivers, or installation media.
- Hardware Conflicts: If your hardware isn’t compatible with the chosen operating system, you may encounter installation errors. Ensure your hardware meets the minimum requirements.
- Installation Freeze: If the installation process freezes, try restarting your computer and starting the installation again. You may need to check your installation media or hardware for any issues.
FAQs about Installing Windows 10 or Windows 11:
Q: Can I upgrade from Windows 10 to Windows 11 without reinstalling?
A: Yes, you can upgrade from Windows 10 to Windows 11 using the Windows Update feature. However, it’s recommended to create a backup of your data before proceeding.
Q: Can I install Windows 10 or Windows 11 on a virtual machine?
A: Yes, you can install Windows 10 or Windows 11 on a virtual machine using software like VMware Workstation or Oracle VirtualBox. This allows you to test the operating system in a safe environment without affecting your main operating system.
Q: What if I lose my Windows product key?
A: If you have a digital license, you can usually reactivate Windows using your Microsoft account. If you have a retail version, you may need to contact Microsoft support for assistance.
Q: How do I create a bootable USB drive for Windows installation?
A: You can use the Microsoft Media Creation Tool available on the official Microsoft website. This tool will download the Windows installation files and create a bootable USB drive.
Q: Can I install Windows 10 or Windows 11 on a Mac?
A: While you cannot install Windows 10 or Windows 11 directly on a Mac, you can use Boot Camp to create a partition on your Mac and install Windows within it.
Tips for a Smooth Installation Experience:
- Ensure a Stable Internet Connection: A reliable internet connection is crucial for downloading installation files and updates.
- Use a High-Quality USB Drive: Use a high-quality USB drive with sufficient storage capacity to create your bootable installation media.
- Check for Updates: Ensure your current operating system and drivers are up to date before starting the installation process.
- Read the Documentation: Carefully read the installation documentation provided by Microsoft to avoid potential errors.
- Seek Professional Help: If you encounter significant difficulties, consider seeking professional help from a qualified technician.
Conclusion:
Installing Windows 10 or Windows 11 is a crucial step in maximizing the performance and security of your computer. By following the steps outlined in this guide, you can navigate the installation process with confidence and enjoy the benefits of a modern, efficient operating system. Remember to back up your data, check system requirements, and install necessary drivers and software after installation. With proper preparation and careful execution, you can successfully upgrade your computer to a new era of computing.


Closure
Thus, we hope this article has provided valuable insights into A Comprehensive Guide to Installing Windows 10 or Windows 11: A Step-by-Step Walkthrough. We appreciate your attention to our article. See you in our next article!